Important widget Row & Column with Example
In this article, we’re going to learn how to use rows & columns in a flutter with an example. This Topic is very very important in flutter development, without Rows & Columns you cannot build UI.

Column
A Column widget displays its children
vertically. It takes a children property containing an array
of List

Column(
crossAxisAlignment: CrossAxisAlignment.center,
mainAxisAlignment: MainAxisAlignment.spaceEvenly,
mainAxisSize: MainAxisSize.max,
children: <Widget>[
Text('Column 1'),
Divider(),
Text('Column 2'),
Divider(),
Text('Column 3'),
],
),

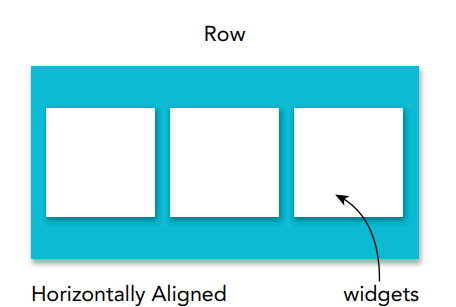
Row
A Row widget displays its children horizontally. It takes a children property containing an array of
List
Row(
crossAxisAlignment: CrossAxisAlignment.start,
mainAxisAlignment: MainAxisAlignment.spaceEvenly,
mainAxisSize: MainAxisSize.max,
children: <Widget>[
Row(
children: <Widget>[
Text('Row 1'),
Padding(padding: EdgeInsets.all(16.0),),
Text('Row 2'),
Padding(padding: EdgeInsets.all(16.0),),
Text('Row 3'),
],
),
],
),
Properties of Row and Column Widgets:
- children: This property takes in List<Widget>, which is a list of widgets to display inside the Row or the Column widget.
- direction: This property holds as the Axis enum object to decide the direction used in the main axis. For Row and Column, it is fixed.
- crossAxisAlignment: The crossAxisAlignment takes in CrossAxisAlignment enum as the object to how the children’s widgets should be places in crossAxisAlignment. For Row it is vertical and for Column it is horizontal.
- mainAxisAlignment: This property takes in MainAxisAlignment enum as the object to decide how the children widgets should be place in mainAxisAlignment. For Row it is horizontal and for Column it is vertical.
Axis size and alignment
We can align the row's children widget with the help of the following properties:
- start: It will place the children from the starting of the main axis.
- end: It will place the children at the end of the main axis.
- center: It will place the children in the middle of the main axis.
- space-between: It will place the free space between the children evenly.
- space around: It will place the free space between the children evenly and half of that space before and after the first and last children widget.
- spaceEvenly: It will place the free space between the children evenly and before and after the first and last children widget.

mainAxisSize property
Row and Column occupy different main axes. A Row’s main axis is horizontal, and a Column’s main axis is verticalmainAxisAlignment property
When mainAxisSize is set to MainAxisSize.max, Row and Column might lay out their children with extra space. The mainAxisAlignment property determines how Row and Column can position their children in that extra space. mainAxisAlignment has six possible values:
MainAxisAlignment.startRow, top for Column)MainAxisAlignment.endRow, bottom for Column)MainAxisAlignment.centerMainAxisAlignment.spaceBetweenMainAxisAlignment.spaceEvenlyMainAxisAlignment.spaceAroundMainAxisAlignment.spaceEvenly, but reduces half of the space before the first child and after the last child to half of the width between the children.crossAxisAlignment property
The crossAxisAlignment property determines how Row and Column can position their children on their cross axes. A Row’s cross axis is vertical, and a Column’s cross axis is horizontal. The crossAxisAlignment property has five possible values:
CrossAxisAlignment.start- Positions children near the start of the cross axis. (Top for
Row, Left forColumn) CrossAxisAlignment.end- Positions children near the end of the cross axis. (Bottom for
Row, Right forColumn) CrossAxisAlignment.center- Positions children at the middle of the cross axis. (Middle for
Row, Center forColumn) CrossAxisAlignment.stretch- Stretches children across the cross axis. (Top-to-bottom for
Row, left-to-right forColumn) CrossAxisAlignment.baseline- Aligns children by their character baselines. (
Textclass only, and requires that thetextBaselineproperty is set toTextBaseline.alphabetic. See the Text widget section for an example.) - Ex.

import 'package:flutter/material.dart';
import 'package:flutter/rendering.dart';

void main() {
  runApp(const MyApp());
}

class MyApp extends StatelessWidget {
  const MyApp({Key? key}) : super(key: key);

  @override
  Widget build(BuildContext context) {
    return MaterialApp(
      title: 'Important widget Row & Column with Example',
      theme: ThemeData(
        primarySwatch: Colors.blue,
      ),
      home: const MyHomePage(title: 'Flutter With Praveen'),
    );
  }
}

class MyHomePage extends StatefulWidget {
  const MyHomePage({Key? key, required this.title}) : super(key: key);

  final String title;

  @override
  State<MyHomePage> createState() => _MyHomePageState();
}

class _MyHomePageState extends State<MyHomePage> {
  int _counter = 0;

  void _incrementCounter() {
    setState(() {
      _counter++;
    });
  }

  @override
  Widget build(BuildContext context) {
    return Scaffold(
      appBar: AppBar(
        title: Text(widget.title),
      ),
      body: Container(
        color: Colors.cyanAccent,
        height: double.infinity,
        width: double.infinity,
        child: Column(
          mainAxisAlignment: MainAxisAlignment.spaceBetween,
          crossAxisAlignment: CrossAxisAlignment.center,
          children: [
            Row(
              mainAxisAlignment: MainAxisAlignment.spaceBetween,
              children: [
                Container(
                  color: Colors.red,
                  height: 50,
                  width: 50,
                ),
                Container(
                  color: Colors.yellow,
                  height: 50,
                  width: 50,
                ),
                Container(
                  color: Colors.deepPurple,
                  height: 50,
                  width: 50,
                ),
              ],
            ),
            Row(
              mainAxisAlignment: MainAxisAlignment.spaceBetween,
              children: [
                Container(
                  color: Colors.black,
                  height: 50,
                  width: 50,
                ),
                Container(
                  color: Colors.pink,
                  height: 50,
                  width: 50,
                ),
                Container(
                  color: Colors.teal,
                  height: 50,
                  width: 50,
                ),
              ],
            ),
            Row(
              mainAxisAlignment: MainAxisAlignment.spaceBetween,
              children: [
                Container(
                  color: Colors.red,
                  height: 50,
                  width: 50,
                ),
                Container(
                  color: Colors.yellow,
                  height: 50,
                  width: 50,
                ),
                Container(
                  color: Colors.deepPurple,
                  height: 50,
                  width: 50,
                ),
              ],
            ),
          ],
        ),
      ),
    );
  }
}


Conclusion
As you can see, nesting Rows and Columns in Flutter can be quite challenging if you don’t know how it works.
I hope that after reading this shot, you won’t have any issues or errors with implementing this concept in your future apps.
Thank you for reading!

_%20Objects%20and%20Classes,%20.webp)

Comments
Post a Comment