Navigation And Routing Understanding In Flutter
Introducing Navigator And Routing
We navigate from one place to another on a daily basis. Whether it’s going from home to a grocery store, the gym, or the office, we navigate through a path to get from a source to our desired destination. Similarly, in Flutter, we have paths that we can use to navigate to the desired widget.
If you are coming from Android, you will be familiar with the concepts of Intents used for navigating between activities and fragments. If you are familiar with iOS then the equivalent is Segues where you use connectors to navigate between views. Coming to Flutter, there are a few ways of navigating between screens.
Flutter introduces the concept of "Navigation And Routing" to describe the action of jumping from the first screen to the second. This transition may include an animation effect to offer a favorable feeling to the user. In this article, I'm going to cover a few ways to get there.
Navigator— a widget that manages a stack of Route objects.Route— an object managed by aNavigatorthat represents a screen, typically implemented by classes likeMaterialPageRoute.
Flutter Navigator class
The Navigator class provides all the navigation capabilities in a Flutter app.
Navigator provides methods to mutate the stack by a push to stack or by popping from the stack. The Navigator.push method is for navigating to a newer page and Navigator.pop is for going back from the current page.
Here is a basic example of pop and push: the push method takes BuildContext as the first argument and the second argument is a PageBuilder. This example uses MaterialPageRoute, which provides the transition animation and handles route changes:
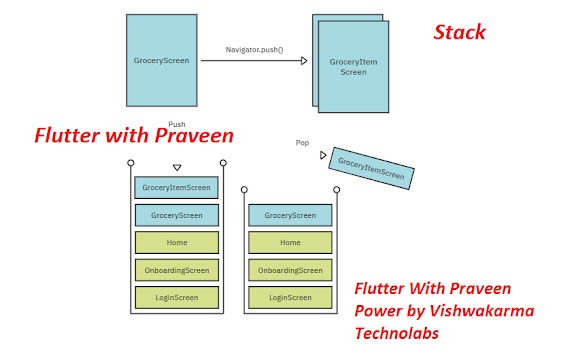
A stack is a data structure that manages pages. You insert the elements last-in, first-out (LIFO), and only the element at the top of the stack is visible to the user.
For example, when a user views a list of grocery items, tapping an item pushes GroceryItemScreen to the top of the stack. Once the user finishes making changes, you pop it off the stack.
Here’s a top-level and a side-level view of the navigation stack:
Navigation
There are three ways to create navigation in Flutter:
Direct Navigation: Direct navigation is implemented with MaterialPageRoute. This is also known as un-named routing.
Static Navigation: Static navigation is implemented by assigning a map of routes to MaterialApp's
routesproperty. The route name is pushed usingNavigator.pushNamed(...). This is known as Named Routing.Dynamic Navigation: In this navigation, routes are generated by implementing
onGenerateRoutecallback in theMaterialAppclass. This is a type of Named Routing as well, and the route name is pushed usingNavigator.pushNamed(...).
1. Navigator.push Method
This method is used to Navigate to the second route.
InkWell(
  onTap: () {
    Navigator.push(context, MaterialPageRoute(builder: (context) => SecondScreen(),));
  },
You can check here how to navigate the new screen in flutter.
2. Navigator.pop Method
The navigator.pop() method is used to return to the first route.
InkWell(
  onTap: () {
  Navigator.pop(context);
  },
Static Navigation:
Named routes
Named Routes allow you to change the path by using strings instead of providing component classes, which in turn enables you to reuse code.
Named routes are defined as a map on MaterialApp. These routes are usable from any part of the application.
Defining routes
The route is a map with string keys and values such as builders that are passed to the routes property on MaterialApp:
import 'package:flutter/material.dart';
import 'package:psquize/Screen/HoneScreen.dart';

void main() {
  runApp(const MyApp());
}

class MyApp extends StatelessWidget {
  const MyApp({Key? key}) : super(key: key);

  // This widget is the root of your application.
  @override
  Widget build(BuildContext context) {
    return MaterialApp(
      title: 'Named Route Navigation',
      theme: ThemeData(
        // This is the theme of your application.
        primarySwatch: Colors.green,
      ),
      // It start the app with the "/" named route. In this case, the app starts
      // on the HomeScreen widget.
      initialRoute: '/',
      routes: {
        // When navigating to the "/" route, build the HomeScreen widget.
        '/': (context) => HomeScreen(),
        // When navigating to the "/second" route, build the SecondScreen widget.
        '/second': (context) => SecondScreen(),
      },
    );
  }
}
We can work with named routes by using the Navigator.pushNamed() function. This function takes two required arguments (build context and string) and one optional argument. Also, we know about the MaterialPageRoute, which is responsible for page transition. If we do not use this, then it is difficult to change the page.
InkWell(
  onTap: () {
    // Navigate to the second screen by using the named route.
    Navigator.pushNamed(context, '/second');
  },


_%20Objects%20and%20Classes,%20.webp)
Comments
Post a Comment